Tuesday 26 April 2016

Helsreach - a futuristic scenic backdrop


Before I can start a project there's always another, related project that has to come first; a disorderly queue of ideas fighting to be the first to be completed. If I had painted my new 40k gang first, I realised I  wouldn't have a nice scenic, futuristic and narrative backdrop with which to photograph them in front of. I really enjoyed doing my fantasy one, so I set about doing the same sort of thing for my new adventures into sci-fi.


I wanted a sandy terrain scattered with lots of rusted junk from the past - some sort of oil refinery, some barrels and an old cargo container were the images I started researching. I then gathered some junk from the recycling bin, picked up some plumbing pipes from B&Q and rummaged through my desk drawers and started putting it all together with the liberal help of a glue gun:


Pringles cannisters, plumbing pipes, plastic washers, tip-ex lid, and paint tube lids were scavenged


Some corrugated card was glued over a foamboard rectangular box, some plasticard edges added, some dowels and metal rods for the doors and a bit of sand for texture. The barrels are simply card temporarily wrapped around a battery, superglued in place with a card lid and then a bead stuck on top. Two thin pieces of wire are wrapped around the circumference and the whole thing covered in pva and a layer of tissue.

Here you can see all the wip and the backdrop printed out onto thick cartridge paper.
Next up are the painting stages, I kept this pretty simple.

Everything was primed grey and then some orangey brown aerosol was applied over the top in patches
A selection of yellows, reds and brown acrylic paints were used for the weathering. These were all generously watered down. Some of these paints had dried out, so you can see I made use of their lids on the modelling of the refinery.
After lots of rusty colours had been washed on, I used some old chrome paint and a coarse sponge to apply some metallic areas, literally dragging the chrome across the surface to create a scratched appearance. Once dry I then washed over this again with the rust colours to dull the metallic shine down.


Lots more rusty washes were applied and then I added some green washes for a mossy effect and some black/brown washes for oil spillages and leaks


The final, more textured layers of rust were created using some pigment bound in some matte varnish. This was stippled on with an old brush


The final stage saw me add some crackle paint to the container in the hope it would crack and separate and leave an appearance of peeling paint. It didn't quite go to plan (in fact this is the second time this experiment has fallen short of expectations), but I needed a different colour to break up all of the orange rust colours.


At the very end of the project, I decided to add some small posters and warning signs. Quite simply some relevant images (including Fallout, Walking Dead, Mad Max images) were gathered from the internet, resized in word to tiny, cut out, crumpled up and pva'd on with a bit of final weathering.


The base is a sheet of mdf with a sand, pva and paint mixture painted on for the texture. I used a couple of testers that I had laying around for the sand colour. Egyptian Hessian or some such. I drybrushed a white over when dry for highlights.
You can see I've also added some clump foliage and bits of lichen for flora and I finally added some sand coloured weathering pigments from MIG to add a dusty feel to the whole thing.  I'll match this effect on the bases of my gang when I get there...
I'm tempted to come back and add a wire mesh fence and maybe even a railway track to add more detail to the scene, but for now this is done. I've almost finished my two first gang members and having this completed will give me extra incentive to try and finish them tonight just so I can take some photos using my new scenic backdrop.


Sunday 17 April 2016

A castle for my son's birthday

My other new and now ongoing project, a castle for my son's 4th birthday. Now obviously my main priority here is to create a cool castle for my son's birthday in June and to see his little face light up when he sees it for the first time, on his birthday morning, with all his soldiers arranged on and around it. But it also provides me with another opportunity to test my terrain building skills and those familiar and new challenges and problems hat need to be researched and solved as the the project progresses. I may even use it for some gaming myself...  

I was originally going to scratchbuild the whole castle, but I didn't think it would sturdy or robust enough, made out of the usual modellers materials of foamboard and extruded polystyrene, to withstand a 4 year olds attentions. So I saw this Simba Playcastle being used by modellers over on the Lead Adventure Forum and decided to buy one from Debenhams for £14, with the aim of modifying it.

So a combination of my hobby project and a present for my boy, what's not to like, even the wife likes the idea and the fact it's handmade by me and cheap! Win win win!

Here's some early progress:

It's a pretty big Castle, about 70x40cn, whic is going to take up a large space in my boys bedroom. I've already got a little table for it to go on. I can't go much wider than 70cm because of the dimensions of he space this will occupy in his room, but I could increase the depth, so I decided to create a front area where a road winds up through some hills towards a moat. For the initial making process I decided to use some thick Celotex insulation board from b&q as the base board as it's lightweight, thick and.easy to work with. Well it's actually pretty horrible stuff to work with and cut into as it's leaves a proper mess and has some fibrous elements holding it together which I didn't want to inhale so the carving and sawing were done outside and then it was PVA glued down to a piece of mdf and left to dry overnight.

I'm sure you can see the modelling/measuring mistake in the above photo. Yep, I somehow completely mid-measure the length of the drawbridge and made the most way too wide! Actually here is a silver lining, I think a narrower most would have looked a bit shit, so I'll now add an outcrop on this side of the most so that it reaches across ok. Some plaster has been laid down and sculpted to look like a road. Next up I'll paint a brown paint/sand/PVA glue over the entire thing to create the ground work as inspired by Rab

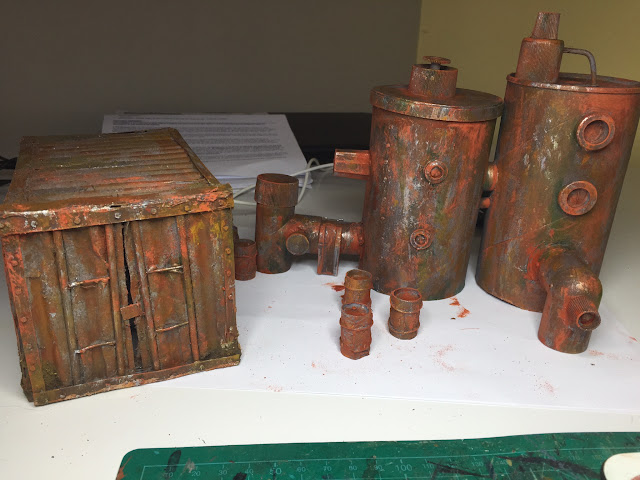
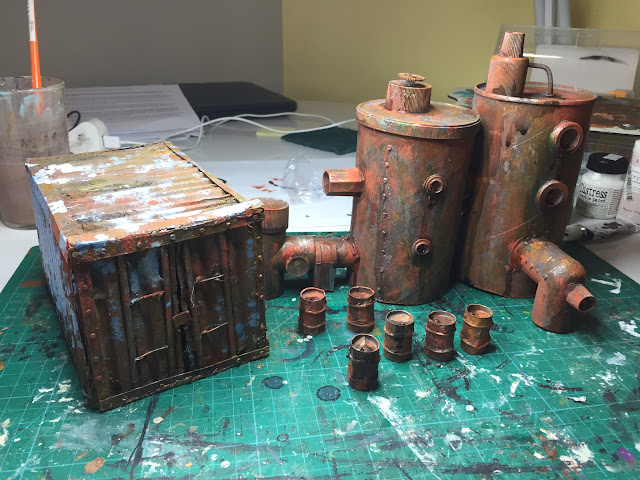
But I needed to do some scratchbuilding as well, so I found some inspiration on the Internet, gathered a Pringles tube, a herbs container, some wooden stirrers from a coffee franchise, some matches, my glue gun, PVA and some thick card and created this:


Now this ain't particularly sturdy, but it was good fun to make and helps improve the overall look of the castle, less toy and more scratchbuilt joy. If it gets broken, it's no big deal and can easily be glue gunned back again. I'm about to make a small stable next as the final building and then the painting of the whole thing can commence. I've got about 7 weeks until his birthday, so I'd better not get sidetracked with all these 40k ideas I have in my head. How can I scratchbuild an oil refinery...?

Wednesday 13 April 2016

Adventures into 40k: Mercenaries for Helsreach


Aside from a few bolters and my scratchbuilt Freeway Fighter model, I've always steered clear of 40k. Partly because my mind is only capable of being immersed in one fantasy world and partly because I quite simply prefer swords and chainmail to Lasguns and Exo-Armour (I'm not sure if that's even a 40k thing). But inspiration found in the blogging sphere and also my new-found love of sci-fi/post apocalyptic films (in particular Firefly and Mad Max), I've slowly been seduced and convinced myself it's time to embrace Rogue Trader and all it's possibilities. Well initially some if it's possibilities as I explore the setting.


To make this be more than a hollow promise to myself, I've signed up for Whiskey Priest's: Logan's World - Helreach at BOYL 2016. So I now have a specific deadline and outline for which to work towards. So here's what I'm going to do; a band of Mercanaries with a Mad Max-esque car:


From left to right, Copplestone, Foundry, Copplestone BOYL2015 mini, Hasslefree with Citadel dragon (very much inspired by illustrations from the Rogue Trader rulebook and JB's wonderful version), Hasslefree, Foundry and Copplestone.
I don't have any 40k figures lying around, so the idea was to quite simply choose some of my favourite sculpts from a range of online retailers, focusing on characterful and dynamic sculpts. It feels satisfying to buy from small independent companies and I didn't want to scour Ebay for old Rogue Trader models, mostly because I don't have any nostalgic attachment to the old sculpts.


I'll be painting these up with a dusty, worn and battle-hardened appearance.


But this crew need a vehicle, or at least I have the itch to kitbash and modify a model car into something dark and futuristic:


1:43 scale works best I've found and I got hold of this Heller Peugeot really cheap. I'll use the chasis and futurise it with some wheels and exhausts from the plastic Ork Warbikes. Amongst this lot you can also see some guitar wire (perfect for tubing), some old computer components (perfect for raised engines), some platicard, plastic rods, my tiny collection of 40k guns, some gauze and some Zinge Industry bits to help modify the car.
 For inspiration I've been looking at the following inspiration from Google Images (apologies for giving no credit to the original owners):


So my version will be loosely based upon these, but generally made up as I go along with what "feels" right within the limitation of the bits I have gathered. The biggest modifications will be raising up the vehicle, cutting away the back to create a gunning platform and adding a roof rack.

My very first obstacle was that the plastic Ork bikes come with 4 different wheels and only one of them seemed suitable for making the car more of an off-road, raised buggy. Initially I was exploring just buying the bitz separately, but then I remembered I had some InstaMold lying around. Perfect opportunity to use it again (last time was to mold some plaguebearer stomachs for my beastmen):


Hot water to soften the Instamold, the bitz embedded in the mold and some tweezers.
The impression left by the wheel is pretty sharp. A little bit of detail is lost but these wheels will be weathered and muddied when painted, so no biggie.
And with the cured greenstuff removed from the molds, crisp enough for me. All I need to do now is smooth down the backs, join them together and fill any gaps. Another couple of sets to do, enough so I have  spare wheel to add to the baggage.
 
Next up I'm going to paint a few of the figures and cut and build the shit out of that car!


Saturday 9 April 2016

Citadel's classic "Champions of Nurgle"

I've finished all 11 of the original Citadel Nurgle Champions and for me this is an achievement which sits firmly at the summit of my geeky leaderboard. In doing so I've managed to fulfil my collecting needs, my converting and conpletionist needs and also itched the Nurgle painting bug all in one fell swoop (well over a month or so). In fact I t feels like I've completed some challenging quest and I'm now awaiting to level up in the hobby. What new skill will I acquire; osl, nmm, patience, satisfaction with what I've got or blending level 2..?

Anyway are the motley bunch of Nurgle minions, striding forth to bring pestilence and much mirth to the area :


Having completed this quest, my new short-term hobby quests I've seemingly unlocked are:

1. Make a castle and scenery for my son's birthday in June

2. Create a Logan's World/Helsreach, 40k Mercenary Warband (with Mad Max style vehicle) for use at BOYL 2016.

Thursday 7 April 2016

Nurgle Chaos Champions #'s 073167/7 and 073167/9 (converted)


The last two original Nurgle Champions to complete the collection are done! Now the eagle eyes amongst you will notice that these are now not original as I have converted them, on the one hand to add a large standard and on the other to (I think) improve the weapon on the original miniature (which was a bit small and pathetic in my opinion).


So after the conversions were complete I had to make some decisions regarding the painting. I decided for the banner bearer to work in a purely brown palette, relying on a range of brown hues which I have collected over the years. The same holds true for the banner. I then wanted to highlight the fun loving nature of the Nurglings (I imagine he has an Infestation of Nurglings) by painting them in bright, vibrant colours:


For the banner I decided to use some Ian Miller imagery, from the LatD tome. Combing three of his heads into a vaguely Nurglesque icon, using lots of sketchy brush marks to add to the decaying nature of the browned banner. I tried to have a few different expressions in the faces, from mirth to malignity. I then added a realistic fly at the top in a compositional whim. The painting style was borrowed from the inspirational Nico's blog:


The final Champion of Nurgle proved to be a bit more of a challenge in terms of colour schemes.


I wanted to add some vibrancy to the group and realised I hadn't used any purple on the previous models. During the painting of this model I realised that it needed a second colour and decided that yellow would work pretty well to complement the purple; this type of organic planning is pretty much my approach to painting. It was only half way through that I realised he looked suspiscously Tzeentchian in his appearance. Rather than scrap the colour scheme (especially as the painting was going well) I decided that he could be a Tzeentch deserter or possibly a Nurgle minion who intends to spy on his enemies warbands. It may not be the best narrative but it beats me having to repaint the bastard! In fact now the collection is complete (photos to come) I will write up a piece of narrative to accompany them....

Tuesday 5 April 2016

Nurgle Chaos Champion #073201/113

The elusive one. This model has taken me years to own and it was thanks to a certain Graham Bailey from the Oldhammer Community who sold me his, that allowed me to complete the collection. I have no idea why he is so rare (when he does come up on auction, you're looking at close to £50 for him), maybe he was just released in limited numbers? He's not only rare, but also a very cool sculpt (perhaps his rarity adds to this though). The Nurgling holding onto his horns is pretty cool and allowed me to get some nice contrast with the greens and Browns of his weathered armour. I also like the fly design on he face of his helmet, and talking of helmets he has that phallic Nurgle symbol on his axe shaft. Steady.


On other nice detail is the small face carved into his knee armour. Here you can also see that I went for some classic Nurgle transfers for his shield (I'm a bit bereft of ideas at the moment and I'm also keen to complete the collection and move onto other pressing projects).

All in all a wonderful model thst I'm so very pleased to eventually have in my collection and to have finally painted. He's an iconic and  original RoC Citadel miniature that helps link and  illustrate my last post which showcased the wonderful sculpts from the Pantheon of Chaos range over on Kickstarter.

Right last two to paint up to finish this project..

Monday 4 April 2016

Pantheon of Chaos Kickstarter


I've never used Kickstarter before, but this project - the Pantheon of Chaos, has got me signed up without hesitation. You may have noticed my predilection for Chaos and in particular classic, Citadel Nurgle models (just two more to paint from the original collection) and these guys, with their wonderful and characterful sculpts, have completely nailed the style that I so love. Here's a small selection of their sculpts, that I'll hopefully have my hands on in August:


Completely in keeping with the ethos of the Lost and the Damned!